
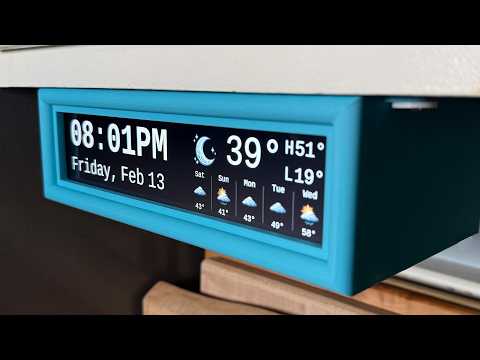
Building a DIY under-cabinet clock with a Raspberry Pi offers a functional and customizable way to modernize your space. As explained by creator and designer Anoraker, this project emphasizes simplicity and practicality, creating a glanceable display for essential information like time and weather. A key feature of this design is its reliance on a horizontal screen paired with a 3D-printed case, making sure a polished look while eliminating the need for touchscreens or voice commands. This approach keeps the setup straightforward and accessible, making it suitable for kitchens, workspaces, or any area where quick, distraction-free updates are helpful.
You’ll learn how to assemble the necessary components, including connecting the Raspberry Pi to a compact display and fitting everything into a custom case. The explainer also covers how to configure the software, such as installing a pre-configured script to streamline setup. Additionally, you’ll see how to personalize the display with options like custom layouts, visual themes and case designs, making sure the final product aligns with your style and needs. By the end, you’ll have a sleek, functional clock that enhances your environment without unnecessary complexity.
DIY Under-Cabinet Smart Display
TL;DR Key Takeaways :
- Building a DIY under-cabinet smart display with a Raspberry Pi offers a sleek, customizable alternative to traditional digital clocks, focusing on simplicity and glanceable information like time and weather.
- The project emphasizes accessibility with straightforward assembly, modular design and freely available 3D printing files for the case, making it beginner-friendly.
- Customization options include visual themes, case designs and display layouts, allowing users to tailor the device to their preferences and environment.
- The assembly process involves setting up the Raspberry Pi software, connecting hardware components and mounting the display, resulting in a polished and functional device.
- The modular nature of the project enables future enhancements, such as adding new features, experimenting with layouts, or creating different versions like desk clocks or multi-display setups.
The primary goal of this project is to replace traditional under-cabinet clocks with a modern, always-on smart display that delivers essential information at a glance. Unlike many smart devices that rely on advanced features such as voice commands or app connectivity, this project focuses on simplicity and functionality. The display is designed to provide quick, glanceable data without requiring user interaction, making it an ideal addition to spaces where convenience and minimal distractions are priorities. By prioritizing practicality and ease of use, this project ensures that the display remains a functional and unobtrusive part of your environment.
What You’ll Need
To bring this project to life, you’ll need a few essential components:
- Raspberry Pi: A compact and versatile computer that serves as the core of the display. It requires an SD card preloaded with the operating system and display software.
- Horizontal display: A small screen, often designed for PC cases, to serve as the primary visual interface for time, weather and other data.
- Cables: A long power cable and an HDMI cable with a right-angle adapter to ensure a clean and seamless connection.
- 3D-printed case: A custom enclosure to house all components, providing a polished and professional appearance while protecting the hardware.
These components are widely available and the modular design of the project allows for easy upgrades or replacements, making sure long-term usability and adaptability.
DIY Raspberry Pi Clock Project
Take a look at other insightful guides from our broad collection that might capture your interest in Raspberry Pi.
Customizing Your Display
One of the most appealing aspects of this project is its high degree of customization. You can tailor the display to suit your preferences and aesthetic needs in several ways:
- Visual themes: Personalize the display by swapping out weather icons, fonts and backgrounds. Options range from minimalist designs to bold, themed styles such as retro graphics or modern patterns.
- Case design: Choose from a variety of 3D-printed case designs, available in different colors, materials and finishes to complement your space.
- Display layout: Adjust the arrangement of information to prioritize what matters most to you, such as enlarging the time display, adding detailed weather data, or including additional metrics like indoor temperature.
These customization options ensure that the display integrates seamlessly into your environment while reflecting your personal style and preferences.
Step-by-Step Assembly
The assembly process is designed to be straightforward, even for beginners and involves the following steps:
- Software setup: Use the Raspberry Pi Imager to install the operating system and a pre-configured script for the display. This step ensures the Raspberry Pi is ready to run the display software right out of the box.
- Hardware assembly: Connect the power and HDMI cables to the Raspberry Pi and the display. Fit all components into the 3D-printed case, making sure a secure and tidy installation.
- Final installation: Mount the case under a cabinet or in your chosen location using adhesive strips or screws. Once secured, power on the device to begin using your new smart display.
The result is a sleek, functional display that provides essential information at a glance, enhancing the convenience and utility of your space.
Expanding the Project
The modular nature of this project opens up a wide range of possibilities for future enhancements. Here are a few ideas to inspire your next steps:
- Develop a round desk clock version for use in offices, bedrooms, or other personal spaces.
- Integrate additional features, such as message boards, calendar reminders, or intercom functionality, to connect multiple displays throughout your home.
- Experiment with new display layouts or add support for additional data sources, such as news headlines, stock updates, or fitness metrics.
These ideas allow you to build on the initial project and explore creative ways to expand its functionality, making it even more versatile and tailored to your needs.
Making the Project Accessible
Accessibility is a key focus of this project, making sure that it is approachable for a wide range of users. The 3D printing files for the case are freely available online and many local libraries or maker spaces offer 3D printing services for those without access to a printer. Additionally, the project uses a weather service that does not require API keys, simplifying the setup process for beginners. These considerations make the project an excellent starting point for hobbyists and first-time builders, while still offering plenty of opportunities for customization and expansion.
Join the Community
This project thrives on collaboration and community engagement. By sharing your builds, customizations and feedback, you can contribute to the ongoing evolution of the project. The open source nature of the initiative encourages innovation and inspires others to take on similar projects. Whether you’re an experienced maker or a first-time builder, your contributions can help shape future iterations and spark new ideas. Engaging with the community also provides an opportunity to learn from others, exchange tips and discover creative approaches to enhancing your display.
Media Credit: Anoraker
Filed Under: DIY Projects, Guides
Disclosure: Some of our articles include affiliate links. If you buy something through one of these links, Geeky Gadgets may earn an affiliate commission. Learn about our Disclosure Policy.
Credit: Source link